Silage Pit Construction for Small Farmers

Silage Pit Construction for Small Farmers

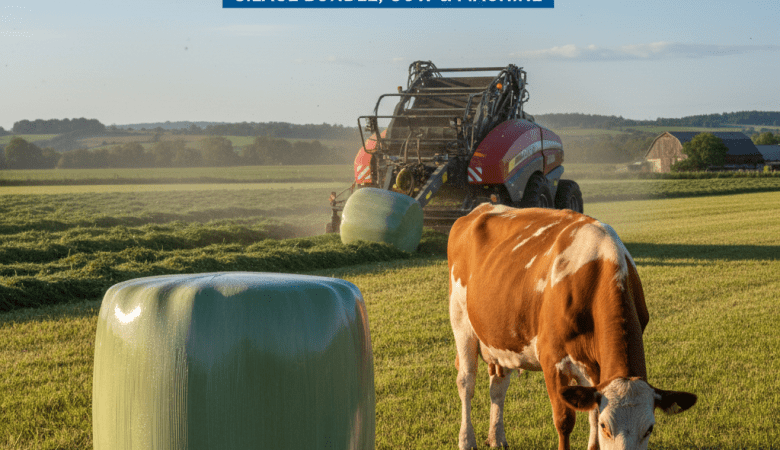
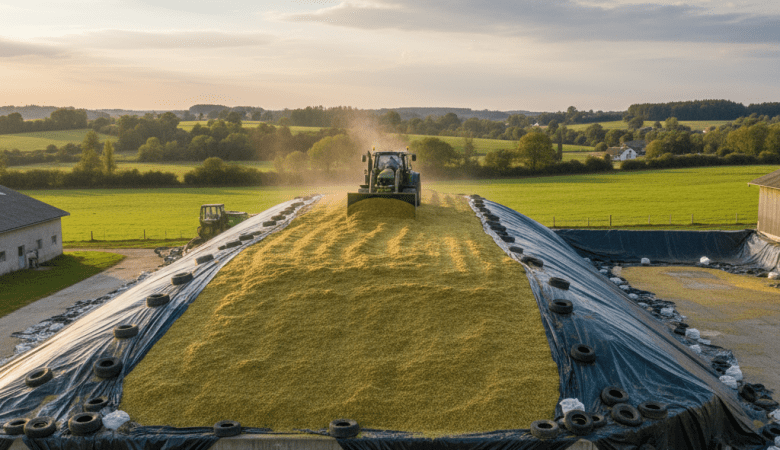
Silage Pit Construction for Small Farmers: A Step-by-Step Low-Cost Guide Silage is an essential feed resource for dairy farmers, especially during dry seasons when green fodder is scarce. For small farmers, building a silage pit doesn’t need to be expensive or complicated. With some planning and basic materials, you can create an effective silage pit that preserves nutritious fodder for your cows and buffaloes. This guide provides a simple, step-by-step approach to constructing a low-cost silage pit suitable for small farms. Why Small Farmers Should Consider Silage Pits Green fodder tends to be seasonal, and during lean periods, animals may not get enough nutrition, affecting milk yield and overall health. Silage pits allow farmers to store excess fodder in a controlled environment, ensuring year-round feed availability. Some key benefits include: Cost savings: Reduce dependence on purchased fodder. Better nutrition: Well-made silage preserves vitamins and minerals in fodder. Improved milk production: Consistent, high-quality feed leads to higher milk yield. Reduced wastage: Proper storage prevents spoilage of green fodder. Step-by-Step Guide to Constructing a Low-Cost Silage Pit 1. Select the Right Location Choose a site that is: Slightly elevated to avoid waterlogging. Close to the feeding area for easy access. Away from areas prone to flooding or runoff. 2. Determine Pit Size The size of your silage pit depends on: The number of animals on your farm. The quantity of fodder you expect to harvest in a season. Rule of thumb: A pit width of 2–3 meters, length of 5–10 meters, and depth of 1.5–2 meters works well for small farms. 3. Prepare the Pit Base Clear the area of debris and vegetation. Dig a pit to the required depth. If possible, line the base with a layer of sand or gravel to improve drainage and prevent water accumulation. 4. Construct Pit Walls Use bricks, concrete, or stone to build low walls along the sides. For a very low-cost option, farmers can use compacted earth reinforced with bamboo or wooden planks. Ensure walls are firm enough to support the weight of fodder piled on top. 5. Fodder Preparation Harvest green fodder at its peak nutritional value. Chop fodder into 2–4 inch pieces to ensure proper compaction and fermentation. 6. Filling the Pit Layer the chopped fodder evenly in the pit. Compact each layer by treading or using a wooden pole to remove air pockets. A well-compacted pit reduces spoilage and ensures uniform fermentation. 7. Covering the Pit Cover the filled pit with a thick plastic sheet or tarpaulin to prevent air entry. Place a layer of soil or sand on top of the plastic to hold it down and prevent damage by wind or animals. 8. Fermentation Process Allow the fodder to ferment for 3–4 weeks. Check occasionally for leakage or damage to the covering. Avoid opening the pit prematurely to maintain proper fermentation. 9. Using the Silage Remove silage from the pit in small quantities as needed. Always take fodder from the top to maintain the integrity of the remaining silage. Feed to cows and buffaloes gradually to monitor their acceptance and milk response. Tips for Low-Cost Silage Pit Success Reuse materials: Old bricks, bamboo, or plastic sheets can reduce construction costs. Prevent water seepage: Proper drainage ensures silage doesn’t rot. Regular monitoring: Keep an eye on the pit during rainy seasons to avoid spoilage. Keep animals away: Fencing or barriers prevent silage contamination. Conclusion A DIY silage pit is an affordable and practical solution for small farmers to ensure year-round fodder availability. By following these simple steps, you can build a low-cost pit that preserves the nutritional quality of green fodder, reduces wastage, and boosts milk production. With proper care and management, even a small farm can reap the benefits of silage without significant investment. 1. What is the best size for a silage pit on a small dairy farm? The ideal silage pit for small dairy farms is about 2–3 meters wide, 5–10 meters long, and 1.5–2 meters deep, depending on the number of animals and daily feed requirements. 2. How can small farmers build a low-cost silage pit at home? Small farmers can build a silage pit cheaply by digging an earthen pit, lining it with plastic, compacting chopped fodder, and sealing it with soil or sand. 3. Which type of fodder is best for making silage? The best crops for silage include maize, sorghum, napier grass, and sugarcane tops, harvested at the right maturity for maximum nutrition. 4. How long does silage fermentation take in a pit? Silage typically ferments within 21 to 30 days, after which it becomes stable and ready for feeding dairy animals. 5. How can farmers prevent silage from spoiling in the pit? To avoid silage spoilage, ensure proper compaction, airtight covering, and water drainage. Always remove fodder from the top, not sides. 6. What materials are needed to construct a silage pit? You’ll need a shovel, plastic sheet, soil, bricks or bamboo (optional), and chopped fodder. Reusing old materials can further reduce costs. 7. How much silage can feed one cow per day? A dairy cow consumes about 25–30 kg of silage per day, depending on body weight and milk production levels. 8. Can silage be made without a pit? Yes, silage can also be made in silage bags, drums, or bunkers—ideal for farmers with limited space or needing portable feed storage. 9. What are the benefits of silage for milk production? Feeding silage helps boost milk yield, improves digestion, provides consistent nutrition, and reduces seasonal feeding stress on animals. 10. How long can silage last in a properly sealed pit? When properly fermented and sealed, silage can last up to 12 months without losing its nutritional quality. The ideal silage pit for small dairy farms is about 2–3 meters wide, 5–10 meters long, and 1.5–2 meters deep, depending on the number of animals and daily feed requirements. Small farmers can build a silage pit cheaply by digging an earthen pit, lining it with plastic, compacting chopped fodder, and sealing it

Silage Making Process

Silage Making Process | How to make Silage A stable supply of green fodder throughout the year is one of the biggest challenges for dairy farmers, especially in regions with distinct seasonal variations. During the monsoon season, green fodder production is often in surplus, yet not all of it is utilized efficiently. On the other hand, in summer, dairy animals may face a shortage of quality green feed, which directly affects milk production and animal health. One of the most important aspects of animal husbandry is providing the right and nutritious feed for your livestock. If you want to increase your animals’ milk production and store feed for a long time, silage is an excellent solution. Silage is a type of preserved feed that can be stored for an extended period while providing high-quality nutrition to your animals. What is Silage and Why is it Important? Silage is chopped green fodder that is preserved immediately after harvesting. Silage is the process of preserving chaffed green fodder under anaerobic conditions (without air) through natural fermentation. Microorganisms convert the sugar present in the green fodder into lactic acid, which prevents spoilage and allows the fodder to be stored for extended periods—up to six months or even a year if handled properly. This method is particularly effective in regions where fodder shortages during summer affect milk production. By feeding silage to animals during lean days, farmers can maintain both their herd’s health and productivity. Benefits of silage: Increases milk production. Improves animal health. Reduces dependency on seasonal feed availability. Can be stored for long-term use without spoilage. Materials Needed for Making Silage The main ingredients required for silage are: Corn (Maize) – Highly nutritious and preferred. Sorghum (Jowar) – Alternative to corn. Millet (Bajra) – Another alternative. Corn is preferred due to its superior nutritional value and higher yield potential. A variety of green fodder and crop residues can be used to make silage: Grasses: Koner grass, maize fodder, or other green grasses. Legumes: Lucerne, clover, or similar legume crops. Crop Residues: Onion leaves, cereal crop residues, and other leftover plant material. The Silage Making Process Harvesting and Preparing Fodder Chop maize or other green fodder into small pieces. Use a fodder chopping machine or simple manual cutting tools. Leave the chopped fodder open for 1 hour to release excess moisture. Storing Silage There are several storage options for silage: Silage bags – convenient for small farmers. Containers – suitable for larger farms. Paste or room-type silage – ideal for large-scale dairy operations. All storage methods require proper pressing of the fodder and covering it with paper or lamination to prevent air exposure. Why Use Paper or Lamination? Prevents oxygen from entering the silage. Encourages the production of lactic acid, which preserves the fodder. If air enters, the silage may spoil quickly. When to Use Silage Begin using silage 45 days after pressing. Once opened, use gradually and cover the remaining portion properly. Ideal Stage for Corn Harvest For making silage, corn should be harvested in the milk stage: When kernels are not fully mature. At this stage, corn has the highest nutritional value for silage preparation. Steps to Prepare Silage 1. Preparing the Corn Cut and clean the corn properly. Ensure all material is free from dirt before processing into silage. 2. Pressing Place the chopped corn into a silage press machine. Remove all air from the feed to prevent spoilage and maintain quality. 3. Storing Fill the pressed material into silage bags or storage boxes. Seal completely to prevent air or moisture from entering. 4. Enhancing Nutrition (Optional) You can add protein sources or other nutrients to the silage. This boosts milk production and overall animal health. How to Use Silage Silage can be fed to animals in any season. Especially useful during rainy or cold periods. Nutritional value peaks in about two months, improving milk output significantly. Why Make Silage Yourself? You can build your own silage setup without relying on external suppliers. Reduces costs and ensures consistent quality. Allows you to customize feed according to your farm’s specific needs. Advantages of Using Silage Bags Silage bags offer several benefits over traditional storage systems: Economical and Efficient: Bags are more affordable than traditional silos and can be used on a small scale. Portable and Easy to Store: Available in sizes ranging from 100 kg to 1,000 kg, these bags are easy to transport and store. Nutritional Preservation: Silage stored in bags retains its nutritive value for a long duration. Waste Utilization: Crop residues that would otherwise be burned or discarded can be converted into nutritious fodder. Step-by-Step Guide to Making Silage in Bags Chop Fodder: Cut green fodder into small pieces about 3 cm in length. Prepare Additives: For 100 kg of fodder, mix 2 kg jaggery and 1 kg common salt in 3 liters of water. Sprinkle this mixture evenly over the chopped fodder. Layer Filling: Fill the bag layer by layer, pressing each layer tightly with uniform pressure to remove air pockets. Moisture Control: Optionally, sprinkle rice bran to absorb excess moisture. Seal the Bag: Once filled, close the bag tightly to maintain anaerobic conditions. Storage: The bag can be stored for several months without losing nutritional value. Feeding Guidelines Cattle can be fed 10–15 kg of silage daily depending on their size and production needs. Silage ensures that green fodder is available even during lean periods, supporting consistent milk production. Tips for Large-Scale Silage Production For larger dairy farms, adopting modern machinery can make the process more efficient: Machines to chop the fodder. Machines to convert chopped fodder into well-packed silage. Lamination machines to seal silage completely. This ensures long shelf life and easier storage. Benefits of Silage Year-round green fodder availability – useful during dry seasons or off-season periods. Nutritional value retained – the fodder maintains its original nutrients. Convenient to use – small farmers can use silage bags or containers. Long shelf life – can last 1–1.5 years if stored correctly. Precautions and Limitations

Friendly-support-icon
0 Lakh+

App Downloads 

happy-clients-icon
0 +

Advisor’s Team 

Features Img
0 Cr+

Social Media Reach

quality
0 %

Happy Customers

NEWS LETTER

Subscribe To Our Newsletter

Welcome to TabelaWala, brand name of White Gold Livestock Private Limited, the ultimate marketplace for dairy farmers looking to buy or sell cows and buffaloes online as well as offline.

+91 830 570 6703

Got Questions? Call us 24/7

Working Hours

Monday – Saturday

10:00 pm – 05:45 pm

Contact Us

Address:

Machalpur Khurd, Tehsil Barwaha, District Khargone, M.P. India 451225

Email:

contact@tabelawala.com info@tabelawala.in

TabelaWala
Privacy Overview

This website uses cookies so that we can provide you with the best user experience possible. Cookie information is stored in your browser and performs functions such as recognising you when you return to our website and helping our team to understand which sections of the website you find most interesting and useful.